
Photographing a Diamond on a Black Background: Capturing the Sparkle
Loose diamond photography on black
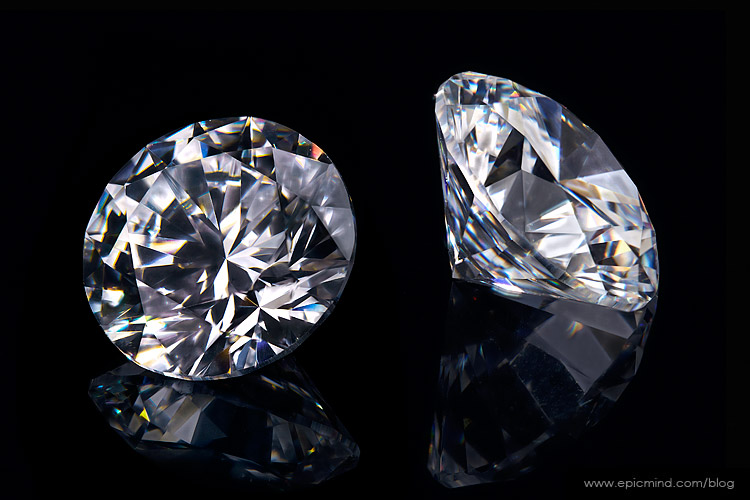
Two diamonds composited together from two individual photos showcasing lovely faceting and fire. A diamond’s beauty lies in its sparkle. The main challenge when photographing the stone is capturing and showing off that natural brilliance. In this project, we’ll shoot loose diamonds against a black background.
A diamond is basically a translucent, prismatic, glass-like object that refracts light. It’s the cut of the diamond that determines the pattern of refracted light and the type of lighting required for the optimal photographic effect.
Some photographers prefer constant lighting because they can quickly see the effect of the light. Others wrap diffusion paper around the stone in a cone like-fashion, pointing lights directly at the subject and also using a multi-LED bulb, such as the Dazzler, to achieve the “fire” effect in a diamond (the flecks of light). Personally, I prefer using my conventional lighting system—strobes, softboxes, or bare lights with reflectors and grids. I think you should be able to get the “fire” from a diamond using these tools alone.
Let’s get started: First, wear gloves. Medical-style latex gloves work well, but any lint-free substitute will do. With gloved hands, inspect the diamond and remove any oils, fingerprints, and dust. I recommend a standard jewelry cleaner with a quick rinse under water. The less retouching we have to do in post-production, the better.
Next, place the diamond on a black Plexiglass surface. In the example above, I have placed them pointing to off-center for a non-standard diamond shot.
Now, we need to look at our light sources. Let’s compare non-diffused light (using the Sun as an example) with diffused light (clouds) on diamonds. On a cloudless sunny day, a diamond will sparkle with all its might, producing the “fire” effect. On a cloudy day, a diamond will be duller and whiter, showing less “fire”. Photographically speaking, we generally want a little of both. Too much “fire” obscures the shape, while too much diffusion loses the life of the stone.
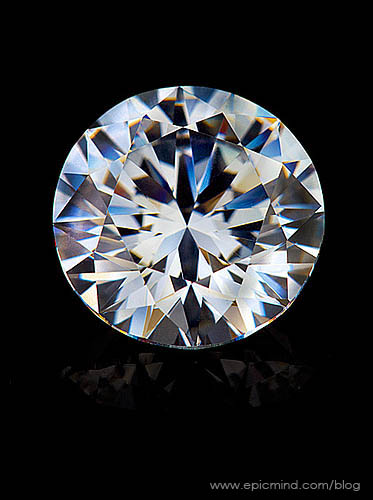
Loose diamond photographed straight-on with softboxes only
Shot using ONLY 2 softboxes, colors boosted in post-processing
Working in the studio, I need to reproduce this in a controlled environment using a combination of bare strobes (which act like the Sun), and softboxes (the clouds). It's a balancing act that requires trial and error to find the right mix to achieve a pleasing image. The advantage of the studio is that I can have several "suns" and "clouds" at my disposal.
I begin by setting up the clouds, with one softbox on each side of the camera, and take a photo. Boosting saturation and adjusting levels in the RAW file sometimes gives enough "fire" immediately, in which case you have a winning shot. (See the straight-on diamond image below.) Often, you’ll need to do more.
To replicate the Sun (a small, non-diffused light source), I use bare strobes at various angles, creating "fire". There is no right or wrong way to shoot. It might take some practice to get the perfect image because every stone is slightly different and reacts uniquely. Continue moving light positions and angles to the stone until you capture the perfect image.

Lighting diagram for diamond image at the top of this blog. Using both "sun" and "clouds" in the studio.
I hope this behind the scenes has given you some insight. Should you have any questions or topic you would like me to maybe cover, please send me feedback below or drop me an email.