
Simple Jewelry Photography Using 2 Lights
I’ve finally made it back to my blog after a long absence – work has consumed most if not all of my time: We’ve been busy shooting hundreds of photos and videos for the fall season which includes the ever popular Thanksgiving/Black Friday and December holidays. It’s the time of the year most retailers make their money. Today’s blog will showcase a very simple 2 LED ceiling lights light setup that can give quite a lovely metallic shine to a ring shot tabletop. The setup consists of using 1 softbox, 1 diffusion panel (in this case, a run-of-the-mill 5-in-1 circular one easily available at any quality photo store) and finally a strobe with a 30-degree grid mounted on it. Scroll down to see the before and after version rollovers.
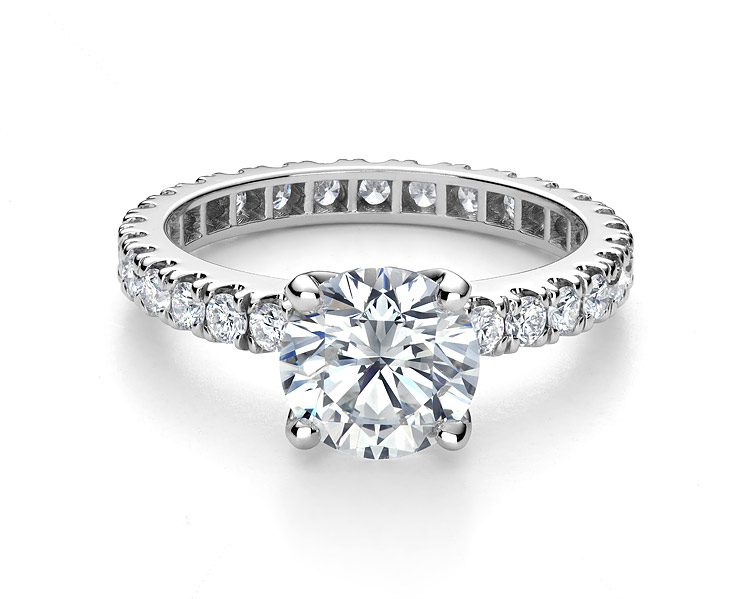
A before and after image for jewelry photography
In the my previous blog post entitled Cosmetic Product Photography Using a Simple 1-Light Setup I showed how we can use a simple 1 light setup to get a lovely gradient shimmer on metallic objects. That time I bounced light on an opaque white foamcore panel. The strobe had a grid modifier mounted on it as well. I re-iterate the purpose: A gridded-strobe hitting a surface will generally diffuse itself somewhat in a nice gradient-like fashion. This will give metals more character and shape.
Normally at our studio we employ 2-3 techniques to light our jewelry or other metallic objects:
Softbox: This gives even light across metallic object – it doesn’t sculpt the object much as the light is rather flat. The “empty space” between softboxes gives the shadow areas that define the object. This is why I normally rarely if ever recommend light-tents – you normally have too little areas with no light therefore your photo will look generally flatly lit, and dull.
Bounced light off white card/foamcore This method is very similar to passing light through a diffusion panel – it’s similar to the above method – it’s a simpler method than nearly anybody can just undertake. The problem with this technique comes when multiple lights are used and several bounces are needed – you need to use flags to block out the light that might created an unpleasant specular highlight on the jewellery. I normally use this technique the least though I do often use this when photographing the collection coins for the Royal Canadian Mint, see the next image. I'll try to discuss that technique in a future blog when time permits.

Bounce lighting technique applied
A coin we shot for the Royal Canadian Mint recently using the bounced light technique.
Diffusion panel based lighting: This is a technique we’re using a little more these days here – I find it gives jewelry a more sculpted, nearly CGI or post-processed look – on quality rings its surreal.

Lighting diagram for 2-light jewelry photography
In any case, and without further a due, here is the setup I used to photograph the image you see above using diffusion lighting: Here's the lighting diagram for the above image. Very simple indeed
The camera was set slightly above table-top level with the diamond engagement ring. As you can see in the reflection in the "before" image, you can see the camera reflection in the prongs holding the center stone. The purpose of the softbox behind the camera was to light-up the diamonds. I could have added additional lights or bounce cards, but I wanted to illustrate here how such a simple setup can lead to a nice image.
The gridded-strobe was aimed to give a pleasant graduated feathering of light on the top portion of metal - play around with it; we're in the digital age, so play around and see where you like the light, and at what strength.
In post-processing, we cleaned up the ring and diamonds: we desaturated the gold and then applied a color balance of cyan/blue to make it more "metallic" - take this as "artistic liberty". The diamonds are adjusted on their own layer. I kept the original background and again, simply cleaned it and adjusted the curves on it.
It's quite a simple setup - but one that gives great results fast. We use more complex setups for jewelry angled differently (such as a standing ring etc), but it's generally a similar principle.
Here is the original image out of camera:
